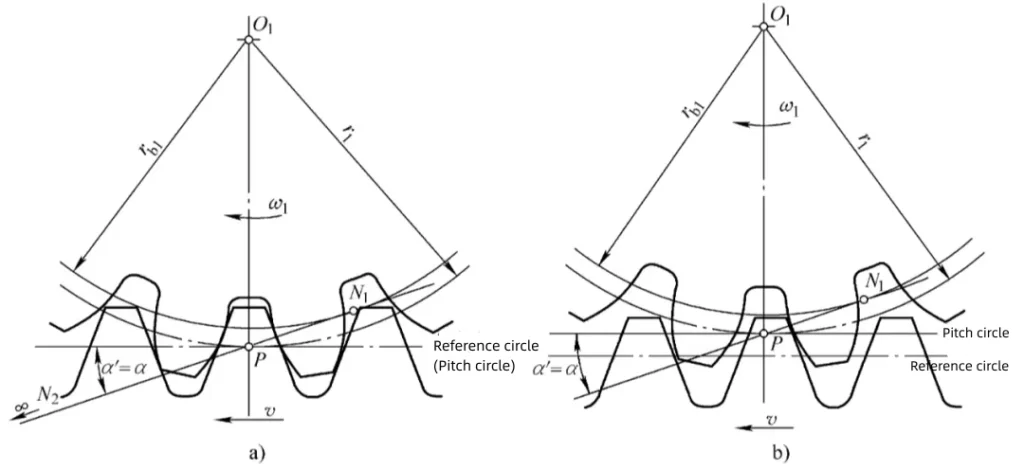
When designing or analyzing gear systems, two fundamental terms often arise—reference circle and pitch circle. While they are sometimes used interchangeably, especially in casual contexts, these two have distinct definitions and serve different purposes in gear geometry and operation. Understanding their relationship is key to precise gear design, and performance analysis.
1. Definition Difference
Reference Circle (a.k.a. Pitch Circle in Standards-Based Design)
The reference circle is a geometrically fixed circle used as the basis for gear design and manufacturing. Its diameter is determined by the module (m) and number of teeth (z) using the formula:
d = m × z
It defines the location where the theoretical tooth thickness equals the tooth space, and where the standard pressure angle (α)—commonly 20°—is applied.
Pitch Circle (in Dynamic Operation)
The pitch circle is a dynamically generated circle formed during actual gear meshing. It’s the locus of points where the gears roll against each other without slipping. Two meshing gears contact at a single point P on their pitch circles, and this point travels along the line of action during rotation.
Its diameter d′ is a function of:
- Actual center distance a′
- Actual transmission ratio i
Thus, the pitch circle reflects real operating conditions, not ideal geometry.
2. When Do They Coincide?
Standard Installation
When two gears are mounted at the standard center distance:
a = m(z₁ + z₂)/2
Then:
- The reference circle equals the pitch circle (d = d′)
- The operating pressure angle α′ = design pressure angle α
This is the ideal condition assumed in most design standards.
Non-Standard Installation
If the actual center distance a′ > a due to mounting tolerance, thermal expansion, or shaft misalignment:
- The pitch circle diameter becomes larger than the reference circle (d′ > d)
- The operating pressure angle α′ > α
This leads to meshing deviations, affecting transmission quality.
3. Dynamic Behavior Comparison
- The reference circle is purely theoretical. It’s used to define gear tooth geometry, spacing, and tooling.
- The pitch circle, on the other hand, reflects the real meshing state under load. It shifts slightly depending on center distance variation, load deformation, and even lubrication conditions.
Understanding this dynamic difference helps in predicting or analyzing:
- Tooth contact behavior
- Transmission errors
- Noise and vibration patterns
4. Engineering Significance
| Parameter | Reference Circle | Pitch Circle |
|---|---|---|
| Purpose | Design and manufacturing | Real-time meshing |
| Usage | Gear cutting, inspection (e.g. measuring tooth thickness, span measurement) | Operational analysis, transmission performance |
| Impacts | Defines theoretical geometry | Affects smoothness, noise, backlash |
| Fixed or Variable | Fixed for a given gear | Changes with actual center distance |
Conclusion
While the reference circle provides the essential framework for designing and producing gears, the pitch circle reveals how those gears perform under real-world conditions. A clear understanding of both is vital for mechanical engineers who seek to optimize gear accuracy, durability, and transmission quality.
Thank you for reading. We are looking forward to serving you with our exceptional gear solutions. #BeyondGears
Read More:


