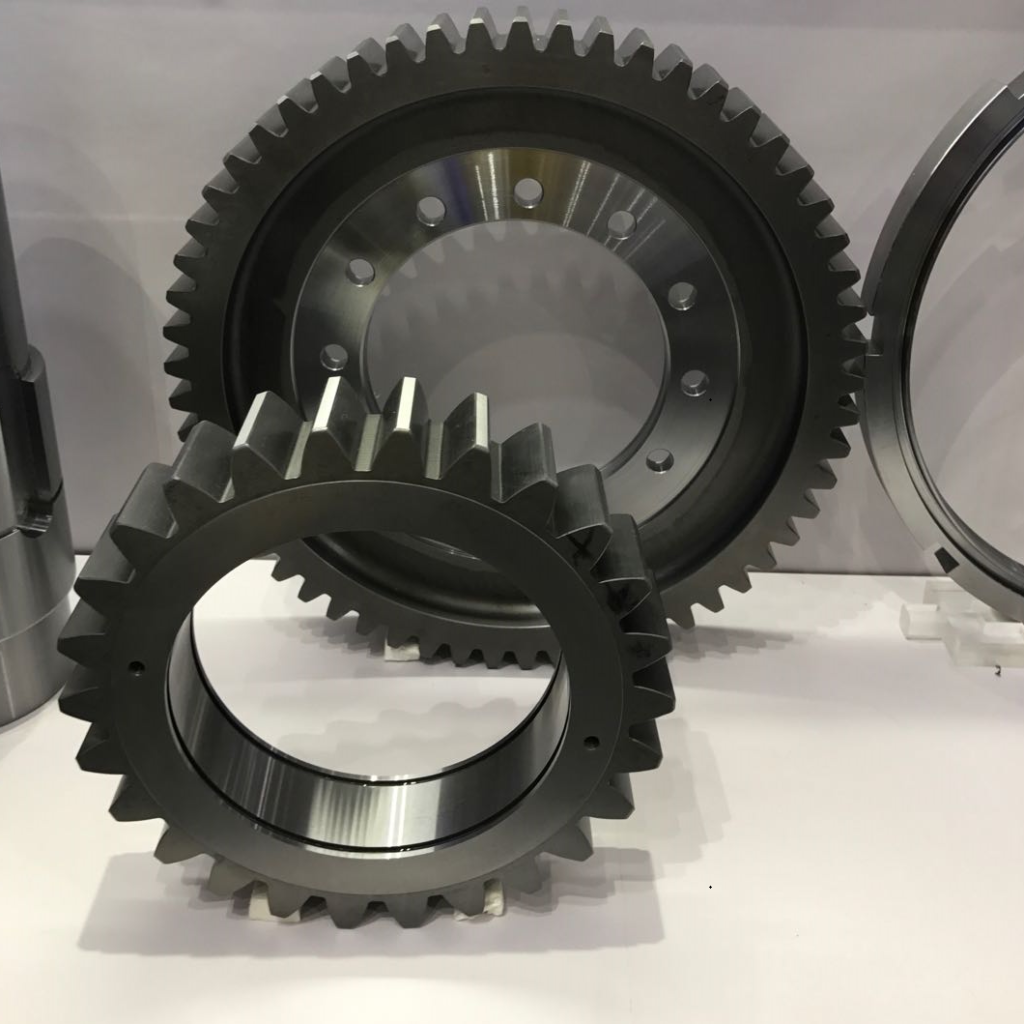
The reducer is widely used in industrial production. The gear transmission of its main component has a strict transmission ratio. The processing accuracy of the gear directly affects the vibration of the mechanical transmission mechanism and the service life of the equipment. Therefore, higher requirements are put forward for the technology and processing methods of the gears in the reducer. Only by improving the precision of the gears can the continuous operation of the equipment be guaranteed, and the work efficiency can be improved. This article introduces the gear processing process, materials, and processing technology and at the same time, elaborates on the application of the internal gear of the reducer and its processing technology.
Material Selection of Gears in Reducer

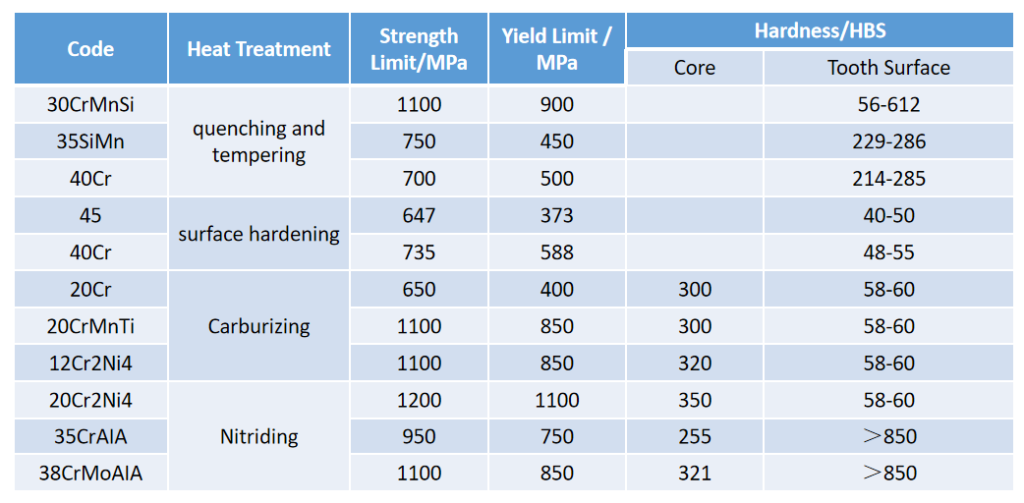
The material requirements are high in the gearbox of the reducer because of its high working strength. Generally, low-carbon alloy steel is used as the common material for gears. The heat treatment method is carburizing. The main advantages of carburizing are:
(1) The overheating sensitivity is small; the state of refined grains can still be maintained at a specific high temperature for a long time, and direct quenching can be realized to ensure the mechanical properties effectively.
(2) Good hardenability; carburized steel has good hardenability so that the material’s interior can achieve better strength and toughness. In addition, the cooled material is not easy to deform and crack to meet the hardness requirements of the gear of the reducer.
(3) Strong carbon adhesion ability; carburized steel usually has a better ability to absorb carbon on the surface, the speed is fast, and the effect is good. The carbon concentration gradient is relatively flat, and the distribution of carbides on the gear surface is very uniform, which significantly enhances the material’s hardness, and realizes that the gear surface requires high hardness, and the core requires toughness and strength.
Gear Machining Method
In gear machining, hobbing, shaping, shaving, grinding, and other processing methods are the most common. Due to the reducer’s long working time and high strength, gears need to have high mechanical strength based on this, and gear hobbing methods are widely used. In recent years, with the continuous improvement and renewal of mechanical technology, related companies have also begun to adopt high-speed gear hobbing technology. The technology combines the minimum quantity lubrication optimization process with the air cooling system to replace the cutting fluid and coolant settings. As a result, the heat generated during the cutting work is absorbed in the metal chips, and the service life of the tool is also ensured based on effectively improving the tooth profile processing efficiency.
When the gear modulus is small, powder metallurgy integral hobs or coated high-speed steel are usually selected to complete the processing in the gear hobbing. After the tool is used, it should be ground, and the coating should be completed here. When the gear modulus is large, it is usually designed as an insert hob due to the cost of the tool. This design method requires regular inspection of tool wear. When the gear modulus is large, it is necessary to use a gear milling cutter to complete the machining.
Machining Technology Design and Analysis
The general process of gear machining is forging→normalizing→rough turning→finish turning→hobbing→tooth end chamfering→heat treatment→grinding end face and inner hole→grinding→precision testing→wire cutting keyway→magnetic particle flaw detection→ultrasonic cleaning rust.
The quality of gear processing is related to many factors, including the suitability of hobbing tool selection, tool installation and helix angle setting deviation, human operation proficiency, processing accuracy, processing size, etc. Next, research will be conducted from different aspects, such as positioning reference angle and machining accuracy. Completing the processing task concerning the process difference can control the error within a reasonable range, thereby improving the accuracy of the gear.
Process Analysis
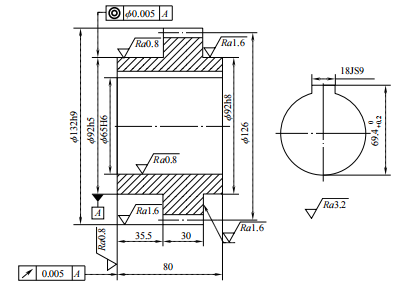
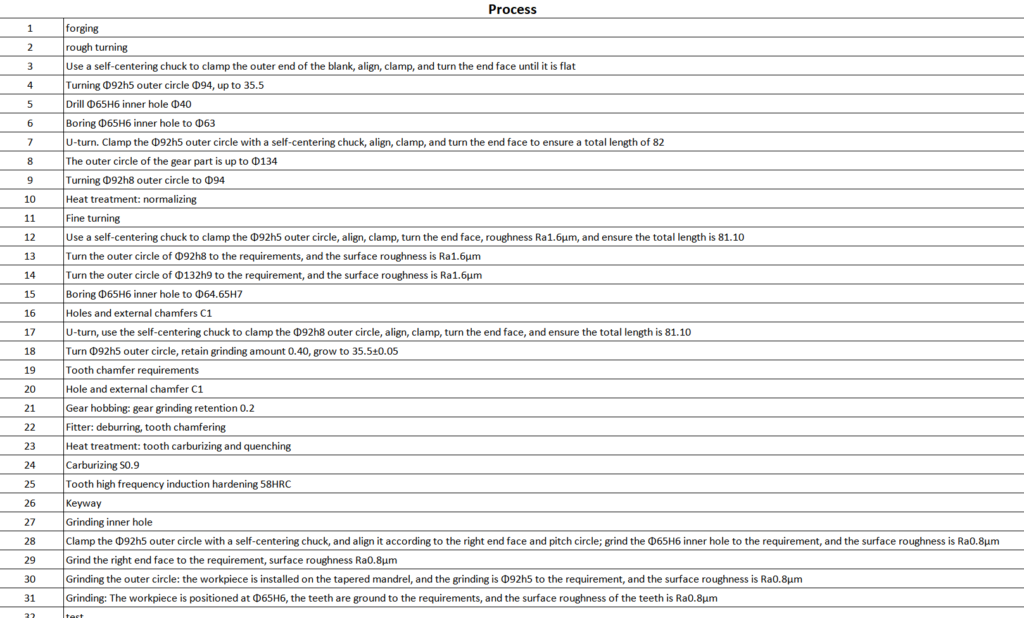
Learn more about the contents of Figure 1. The gear material includes: 20CrMnMo, and the specific precision reaches level 6. The gear parameters are omitted. Its processing technology is shown in Figure 2. To understand the contents of Figure 2 in detail, the specific stages of the gear machining process are as follows.


(1) The first step: gear blank machining.
The tooth blank is forging and should be normalized before rough machining. The specific work in this stage is to process the outer dimension of the gear. In this case, attention should be paid to the accuracy of the outer circle size and the gear hole. Since the tooth shape positioning datum has a high correlation with the machining accuracy, based on this, the work in this stage lays the foundation for the subsequent tooth profile processing. All links in the process need to use uniform geometric tolerances to simplify the processing difficulty.
(2) The second step: tooth profile machining.
Because the gear used in the reducer usually requires load and low speed, it needs the surface to reach a certain hardness. To complete the hardening treatment in this process, it is necessary to ensure that the tooth shape accuracy meets the corresponding processing standards and requirements in this stage. , Finishing stage.
(3) The third step: heat treatment.
The quenching and carburizing treatments are specifically aimed at the teeth in this stage. Carburizing S0.9 is mainly selected. In processing the teeth, high-frequency induction quenching is selected to ensure that the final result matches the hardness requirement.
(4) The fourth stage: tooth profile machining.
The work task at this stage is to correct the deformation of the tooth profile caused by quenching. During this process, the tooth profile roughness will be reduced, and its precision will also be increased to ensure that the gear meets reasonable precision requirements. The first step in this stage is to correct the positioning reference plane. Due to the influence of quenching, both the end face and the inner hole of the gear will be deformed. If the end face and the hole are directly used in the tooth profile finishing after quenching, this will lead to The precision of the gear is not up to standard, and the datum plane after trimming is used in the process of gear finishing, so as to ensure stable but accurate positioning, in addition to ensuring a more uniform distribution.
Datum Determination
The difficulty of tooth profile processing is largely affected by the accuracy of the positioning reference. Through the understanding of gears, two positioning references are selected during the tooth profile processing.
(1) Bore and face positioning. The positioning reference is selected as the inner hole, consistent with the measurement and design reference work. It is necessary to control the precision of the inner hole strictly, and the mass production efficiency is high.
(2) External circle and end face positioning. The outer circle is used as positioning, and the mandrel is usually selected to install the gear blank. The radial runout should be reasonably controlled by means of the outer circle to fix the center of the hole, which is not suitable for mass production.
It can be seen from Figure 1 that the inner hole acts as a positioning datum and its dimension accuracy is marked 65H6. The reference end face itself does not have a large surface roughness, its value is Ra0.8.μm, and the end face circular runout of the reference end to the reference hole is 0.005.mm. The above items all have high requirements. Based on this, when processing the tooth blank, the first thing is to control the verticality of the inner hole and the end surface. The second is that in the process of processing the reference hole, the corresponding margin should be left to complete the finishing after the heat treatment is completed. Otherwise, the assembly accuracy in the later stage will be affected. The grinding method is needed in the finishing process of the end face and the hole. First, the hole is used as the positioning reference grinding end face, and then the positioning reference grinding hole is selected as the end face and the gear index circle so as to ensure that the tooth shape finishing reaches a reasonable accuracy.
The Application of Heat Treatment in Gear Processing of Reducer
The gear of the reducer is subjected to specific contact stress and other stresses during work, which is mainly reflected in the quantity and distribution of reticular cementite and retained austenite in the material. At the same time, the gear surface bears load, and torque must be transmitted during work. Therefore, the gear surface of the reducer must have good hardness and wear resistance, crystal refinement, and the core should have good plasticity and toughness to meet the work requirements. There are two stages involved in the heat treatment of gears: the first is the preheat treatment of the forging blank, and the second is the heat treatment of the teeth.
The heat treatment process of the reducer gear: Generally, the material is blanked for forging first, then processed by normalizing, then cleaned, quenched, tempered, shot blasted, cleaned again, and finally inspected and packaged. However, different factors will affect the heat treatment method of the material, which covers time, cooling method, heat preservation method, etc. Heat treatment experiments have confirmed that forging blanks are processed after rough machining for low-carbon alloy steel with more gears for reducers. The hardness of the material after normalizing treatment will be significantly improved. The specific experimental process ensures that the temperature of the normalizing furnace is raised to 400 and 500°C, that the temperature of the materials in the furnace is raised, and that the temperature is raised to 600°C and 650°C for 3 hours. Then, the temperature was raised to 860°C and 880°C to ensure that the time was maintained. After 2 hours, the temperature was lowered to 350°C and 400°C while removing the material.
Heat treatment in the gear teeth can improve the gear’s wear resistance and fatigue strength. This process is necessary for gear machining. For some materials, such as low carbon or alloy steel, the heat treatment of carburizing and quenching is the most frequently used method, which will lead to elastic deformation. In the heat treatment of teeth, the most important thing is to control and improve the elasticity. It is confirmed by experiments that the amount of carburizing and the temperature of carburizing and quenching are all influencing factors. Using kerosene as the carburizing agent, using a well-type gas carburizing furnace, and setting three carburizing and quenching temperatures, respectively, it is known that due to the continuously rising carburizing and quenching temperatures, the material will appear to a more significant extent Deformation, the austenite structure is more easily affected by the temperature inside the material, and then expands. Due to the increased carbon potential, the carbon concentration in the carburized layer of the material will be directly increased, which will promote unstable carbides, and Martensite will increase to varying degrees and will eventually have a particular impact on the amount of deformation.
Therefore, for the heat treatment of low-carbon and alloy steel materials used as reducer gears, the temperature, time, and cooling method must be strictly controlled, and the carburizing temperature and quenching temperature should be controlled to obtain the best mechanical properties and reduce its deformation as much as possible. , to ensure a more stable working process.
Due to the continuous development of the manufacturing industry, intelligent digital equipment has been widely used in mechanical processing and manufacturing. An important direction of gear technology research is how to apply the gear processing technology better to improve the product’s accuracy, quality, and production efficiency while reducing cost. When processing gears in deceleration machinery and equipment, we should start with an appropriate selection of materials, improve gear hobbing technology, and improve processing technology to improve the gear processing technology further. At the same time, through continuous learning and improvement, we strictly control the quality link to improve the dimensional accuracy bearing capacity and prolong the service life of the gear.
Thank you for reading. Feel free to contact us for further questions.


4 Responses
Very Informative Blog
Nice Blog
Thank you!
Nice Blog