Gear failures occur due to complex working conditions and exhibit different characteristics under different operating conditions. During operation, gears experience bending stress at the tooth root, contact stress at the tooth surface, and wear due to relative sliding friction between tooth surfaces. Sometimes, gear failures occur due to installation or design issues, resulting in excessive backlash and impact during meshing. We find that tooth deformation and breakage cause gear failures due to bending moments, surface fatigue spalling due to contact stress, and wear due to friction. Different materials, manufacturing processes, and usage scenarios can lead to different failures.
The primary forms of gear failure include surface contact fatigue, which can manifest as pitting, shallow spalling, or case spalling. Gear bending failures include fatigue tooth fracture and overload tooth fracture. Gear wear failures can occur as abrasive, corrosive, adhesive, or tooth flank impact wear. Plastic deformation failures include plastic deformation, pressure marks, and plastic bending wrinkles. Based on statistical data from 931 gear failure cases over 35 years, the failure distribution is as follows: fatigue tooth fracture accounts for 32.8%, overload tooth fracture accounts for 19.5%, wheel tooth fragmentation accounts for 4.3%, wheel hub tearing accounts for 4.6%, surface fatigue accounts for 20.3%, surface wear accounts for 13.2%, and tooth flank plastic deformation accounts for 5.3%. This analysis focuses on the failure modes caused by material selection, manufacturing processes, heat treatment issues, or assembly problems.
1. The core hardness may be either higher or lower after heat treatment
Due to strict deformation requirements, the deformation is controlled within the required range to reduce the core hardness and minimize distortion and cooling effects on splines and gear teeth. However, non-martensitic regions may occur at the tooth root, leading to gear failure during operation. Alternatively, improper material selection can produce excessively high core hardness after heat treatment, reducing impact toughness and fracture at the pitch circle.
Improvement methods:
1)Post-heat treatment cold drawing can be employed for gears with strict spline requirements to achieve the desired dimensions.
2)You can choose suitable materials to address high core hardness, or the quenching oil with a slower cooling rate can be replaced.
3)You can treat non-martensitic regions in gears with intense shot peening.
2. Poor Surface Microstructure
Poor surface microstructure mainly refers to intergranular oxidation, non-martensite, poor carbides, and excessive retained austenite at the tooth root. The leading causes of intergranular oxidation and non-martensite at the tooth root are the poor quenching ability of the selected material, inappropriate quenching oil, improper fixation, inadequate cleaning before heat treatment, and excessive impurities in the quenching cooling medium. Improper heat treatment processes mainly cause poor carbides and excessive retained austenite.
Improvement methods:
- Select materials with suitable quenching ability.
- Use quenching oil with an appropriate cooling rate.
- Use specialized heat treatment fixtures.
- Utilize organic cleaning agents.
- Employ qualified quenching cooling media.
- Optimize the heat treatment process.
- Treat gears with excessive non-martensite through intense shot peening.
3. Gear Tooth Grinding Failure after Heat Treatment
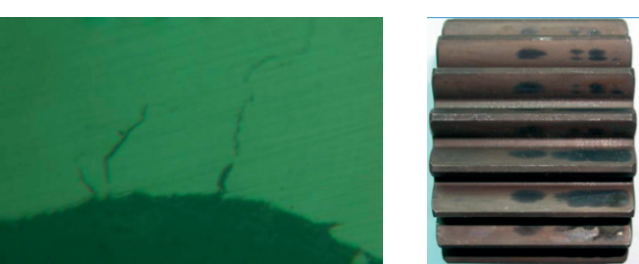
Gear tooth grinding failures can occur due to poor heat treatment resulting in excessive retained austenite and carbides. Inappropriate selection of grinding wheel type, insufficient cooling, and improper grinding parameters can lead to grinding burns or even grinding quenching during the grinding process. Gear deformations can cause uneven material removal and hardening of the tooth surface or grinding of the tooth root during the grinding process. These factors can lead to gear failure during operation.
Improvement methods:
- Optimize the heat treatment process.
- Optimize the microstructure.
- Minimize deformations.
- Select appropriate grinding wheels and processing parameters based on the equipment manufacturer’s recommendations. Perform burn detection during the grinding process. For increased grinding at the tooth root, consider intense shot peening.
4. Coarse Microstructure in the Core after Carburizing and Quenching
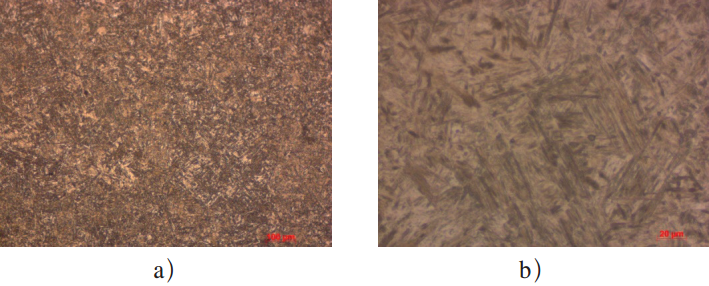
For cold-forged gears, warm-forged gears, or gears made from cold-drawn materials, no microstructural defects are observed after normalizing. However, a coarse microstructure is present after carburizing and quenching, particularly in the core region, leading to failures during operation.
Improvement methods:
- High-temperature normalizing at 940~950°C can be applied for components with machining allowances.
- A secondary normalizing process can be performed for materials that did not pass the initial normalizing process.
- You can use vacuum heat treatment furnaces with dual-end gas quenching for workpieces prone to surface oxidation and decarburization.
- For processes involving carburizing and quenching, the addition of an intermediate cooling process can be considered. This can ensure the microstructure integrity of components that did not pass the initial normalizing process but went undetected.
5. Processing Defects in Keyway Grooves of Gear Shafts
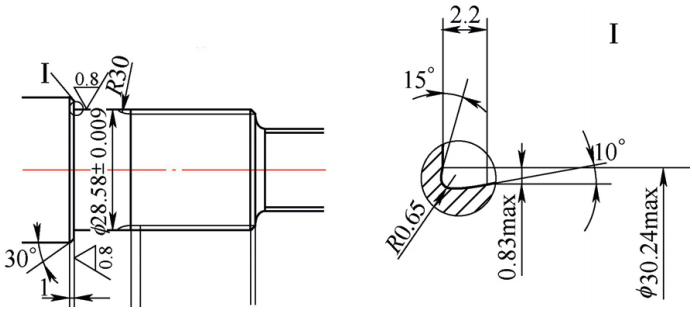
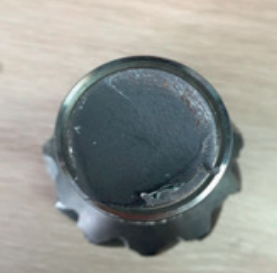
Gear shaft components are designed with keyway grooves. However, due to non-forming tools, processing defects occur in the keyway grooves. Alternatively, excessive deformation of the shaft components after carburizing and quenching can lead to straightening pressure and subsequent fracture during operation.
Improvement methods:
- Utilize forming tools for machining keyway grooves or apply anti-seepage agents to the grooves.
- Employ straightening equipment equipped with crack detection devices.
6. Brittle Fracture of Threaded Gear Shaft Products
Gear shaft products have threads at the ends or in the middle. During the carburizing process, either insufficient or inadequate anti-seepage measures are taken, leading to additional induction or salt bath annealing. Improper annealing processes result in secondary hardening of the threads, leading to brittle fractures during operation.
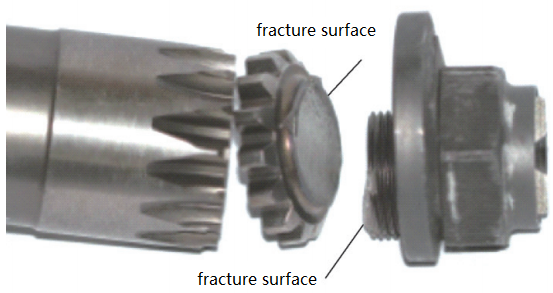
Improvement methods:
Utilize induction annealing for the threads, followed by slow cooling in a refractory asbestos material.
7. Delayed Cracking and Welding Cracking
In some cases, gears are combined with gear shafts after heat treatment using keyways, with a certain amount of interference fit, or welded together to transmit torque. Delayed cracking can occur due to thin gear walls or excessive interference fit, while welding cracking can occur during improper welding processes or incomplete removal of carbon layers at the welding site, resulting in early failures during operation.
Improvement methods:
- Implement protective measures for internal keyways or bores, such as applying anti-seepage agents or using plugs to reduce the carbon layer or surface hardness of the bores and keyways. This can improve the toughness of the internal bores or keyways and prevent delayed cracking.
- For welded components, apply anti-seepage agents at the welding sites or increase allowances to prevent carburization at the welding area. Adopt preheating before welding and slow cooling after welding processes.
8. Excessive deformation causing localized contact
After heat treatment, excessive deformation of the gear results in a significant decrease in precision, causing localized contact and failure during operation.
Improvement methods:
- For significant disc-type components, implement press quenching measures to ensure gear precision.
- For shaft-type components with wider teeth, perform post-heat treatment gear grinding to enhance gear contact precision.
9. Failure of spiral bevel gears
Failure of spiral bevel gears occurs after heat treatment due to excessive deformation, decreasing gear precision grade. In the usage process, localized high stresses lead to tooth failure. Alternatively, improper selection of grinding abrasives and techniques can cause grinding burns on the workpiece during the mating grinding process. It reduces gear surface hardness and wear resistance, resulting in early wear failure during usage.
9.1 Wear of Spiral Bevel Gears
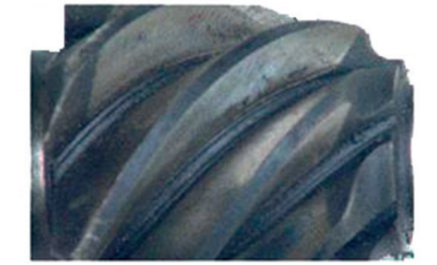
Mild Wear of Spiral Bevel Gears
As shown in the picture below, the characteristic of mild wear is the smoothing of the meshing tooth surfaces and a very smooth surface on the gear teeth with wear ripples. No step is formed at the tooth root, and there is no significant change in tooth thickness.
Causes: Damage caused by improper usage.
- The difference in lubricating oil viscosity results in insufficient lubricating oil film thickness.
- Severe overloading during operation.
- Improper assembly, such as the insufficient preloading force on the driving gear shaft journal, large bearing clearances, causing axial movement of the gear during operation, gradually wearing down the meshing tooth surfaces and resulting in gear failure.
Severe Wear on Bevel Gears
As shown in below pictures, the characteristic feature is the extensive material wear on the working tooth surfaces, leading to the destruction of the tooth profile. These can manifest as tip wear, thinning of tooth roots, stepped wear on the gear tooth roots, increased noise during operation, and early gear failure.
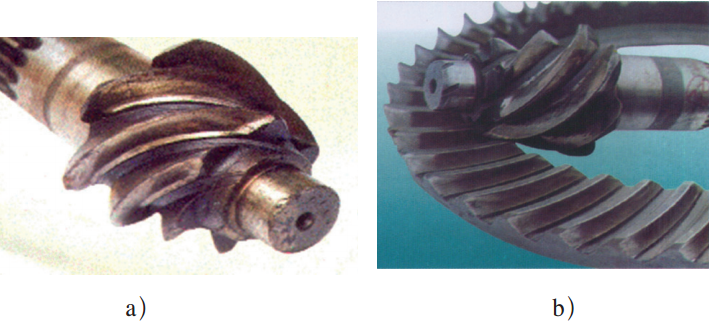
Causes: The severe vibration in the system, poor lubrication system, and inadequate sealing arrangements are the main reasons for this problem. The gears operate at or close to boundary lubrication conditions, where the lubricating oil film fails to establish or is insufficiently thick. Consequently, this results in significant wear on the meshing tooth surfaces.
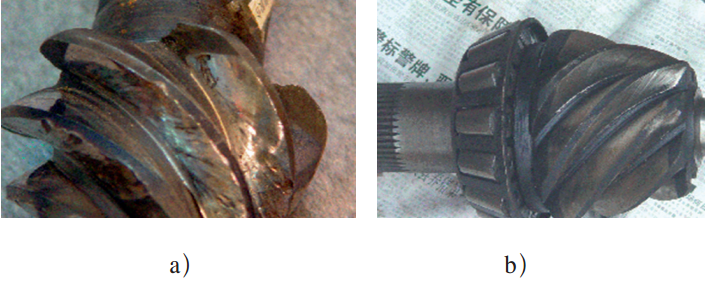
Tooth Surface Wear Striations
As shown in the picture below, the characteristic feature is the formation of uniform stripe-like friction marks along the sliding direction on the meshing tooth surfaces, causing the gears to operate unevenly.
Tooth Surface Adhesion
As shown in the picture below, the characteristic feature is the severe wear on the meshing surfaces of the gear teeth due to friction. Localized overheating of the tooth surface occurs, forming distinct tearing grooves along the direction of motion.
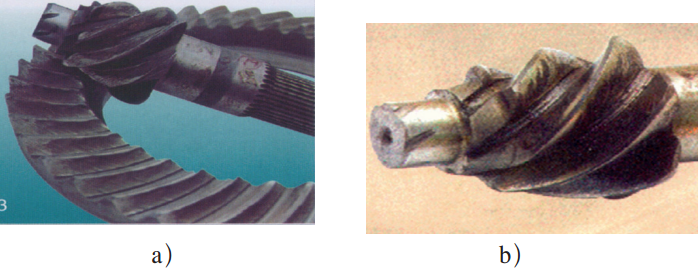
Causes: The leading cause is a severe lack of lubrication in the lubrication system, resulting in insufficient lubrication. The lack of lubrication in the system causes the temperature of the tooth surface to increase rapidly. As a result, the metal melts and forms an adhesion between the contacting surfaces of the gear teeth. The subsequent sliding motion tears apart the adhered surfaces, creating tearing grooves on the tooth surface and ultimately causing gear failure. Improper usage also causes this issue.
9.2 Tooth Surface Fatigue
Early Pitting
The characteristic feature is a polished tooth surface with slight fatigue-spalling pits in the form of clustered dots. The pits are relatively shallow, resembling pinholes or sesame seeds, with a 0.1 to 0.2 mm depth. The cross-section exhibits an asymmetric “V” shape. Such fatigue cracks first initiate from the tooth surface, then propagate inward, eventually resulting in spalling and clustered pits forming.
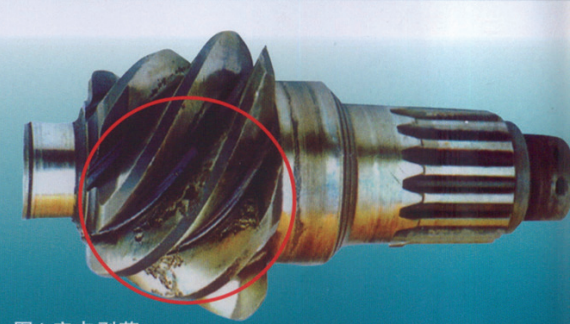
Causes: Defects in product manufacturing quality primarily cause early pitting. Significant tooth profile errors, poor surface roughness during cutting processes, misalignment between the pitch circle and the gear bore, and poor meshing conditions contribute to early localized fatigue damage on the tooth surface during operation. It can also occur due to low tooth surface hardness and low contact fatigue strength, resulting in failure phenomena.
Spalling due to Destructive Pitting
This phenomenon exhibits larger and deeper spalling pits than early pitting. It initially appears on the tooth surface near the pitch circle and then progressively expands, eventually leading to gear failure.
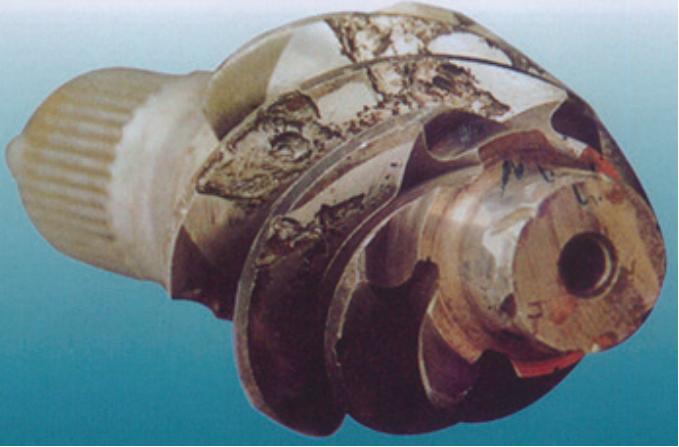
Cause: This issue arises from significantly reducing fatigue strength due to material, manufacturing, or heat treatment quality issues. The stresses experienced by the tooth surface exceed the material strength. With increasing stress cycles, pitting continues to expand, forming spalling pits.
Tooth Surface Spalling
The characteristic feature is the detachment of material in patches from the tooth surface. The spalled metal pieces are more extensive than pitting, and the thickness of the spalled area is approximately equal to the adequate case-hardened layer depth of the product. The bottom of the spalled area remains generally parallel to the tooth surface, while the sides are perpendicular to the surface.
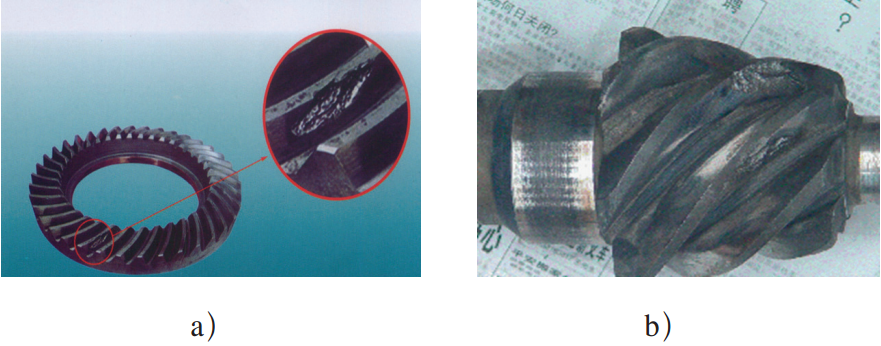
Causes: Tooth surfaces that have undergone surface hardening can experience spalling due to various reasons such as material defects, improper heat treatment resulting in abnormal microstructure, shallow adequate hardening depth, or excessively steep hardness gradients. These factors significantly reduce the contact fatigue strength of the surface layer and subsurface layer of the gear material. The high external stress applied to the subsurface layer during operation leads to the initiation of cracks within the subsurface layer, which propagate and extend towards the surface, ultimately resulting in spalling pits.
Operational Fatigue
The characteristic feature is the presence of prominent ripple marks on the tooth surface. Observers can note material detachment occurring in the form of spalling pits or spalled areas, along with the presence of wear steps at the tooth roots. Some gears may also exhibit plastic deformation.
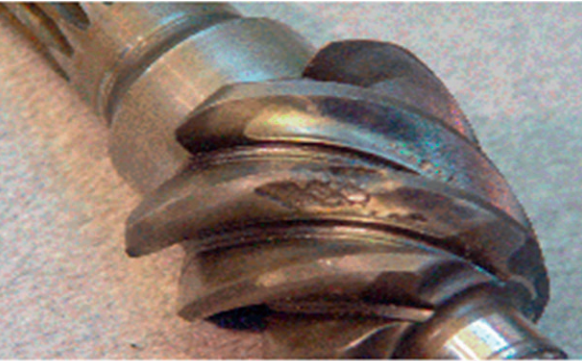
Causes: Under alternating stresses, gears experience surface wear initially, reducing tooth surface hardness. Subsequently, the metal undergoes spalling, failing.
9.3 Plastic Deformation
The characteristic feature is the presence of scale-like wrinkles or plastic deformation on the tooth surface. The scale-like wrinkles are perpendicular to the sliding direction of the gear and distributed along the tooth profile.
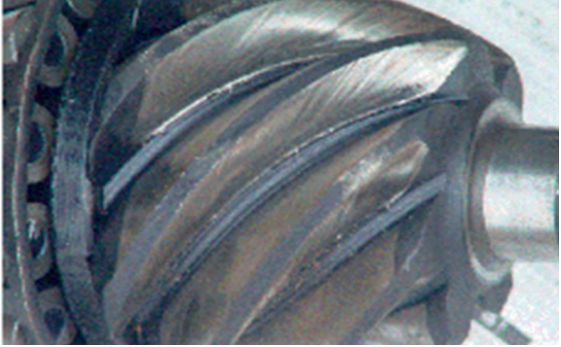
Causes: During gear operation, inadequate lubrication and the insufficient oil film thickness can result in the occurrence of “creep” (adhesive sliding phenomenon) between the working tooth surfaces, leading to the manifestation of scale-like wrinkles or plastic deformation.
9.4 Gear Tooth Breakage
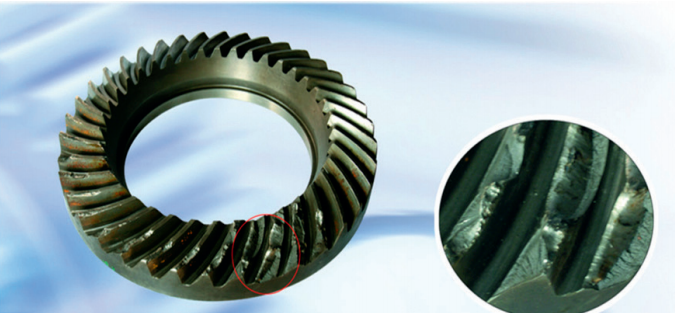
Damage By Other Objects
As shown in the below picture, other components cause damage in this issue, resulting in the gear teeth’ early failure.
Overload Breakage
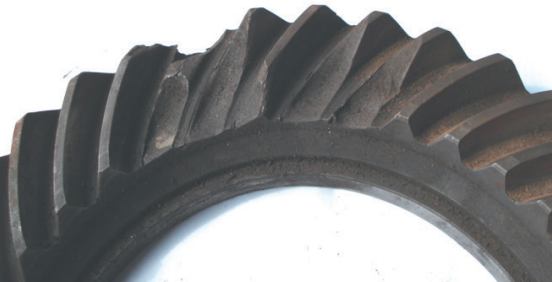
As shown below picture, the characteristic feature is a semi-tooth fracture with an inclined and rough surface. The fracture does not exhibit the characteristics of fatigue failure, such as fatigue propagation zones, and instead shows the appearance of immediate breakage.
Improvement methods:
- Optimize material selection by choosing materials with better mechanical properties and fatigue resistance.
- Optimize heat treatment processes to enhance the hardness and toughness of the gear material, improving its resistance to deformation and fatigue.
- Minimize deformation during manufacturing by employing proper machining techniques, maintaining stable process parameters, and controlling heat input.
- Conduct burnishing and surface roughness inspections on gears with significant deformation to identify surface irregularities or high spots that can lead to stress concentration.
- Apply case hardening treatment to gears with significant deformation to improve their strength and durability.
- Enhance gear precision by implementing quenching processes on gears with substantial deformation.
- Ensure proper gear alignment and tooth contact during assembly to distribute loads evenly and prevent localized stress concentration.
These improvement methods aim to optimize material properties, improve heat treatment processes, reduce deformation, and enhance gear accuracy.
10. Axial Cracks
For some forged gear shaft products, cracks can occur due to significant dimensional differences between the gear and shaft portions, resulting in excessive forging strain at localized areas. Cracks are discovered during precision machining. Axial cracks can also be observed in some key-type shafts at the center of the shaft.

Improvement method: For such gears, perform 100% ultrasonic testing after rough turning to detect cracks.
This improvement method involves ultrasonic testing on these gear components after rough machining to identify potential cracks.
11. Uneven Hardening Layer Causing Cracks
For some disk-type gears subjected to induction hardening, cracks can occur due to inappropriate frequency selection, low precision in the induction coil design, and insufficient machine tool accuracy. As a result, the hardening layer on the gears became uneven, leading to cracks and failed bench tests.
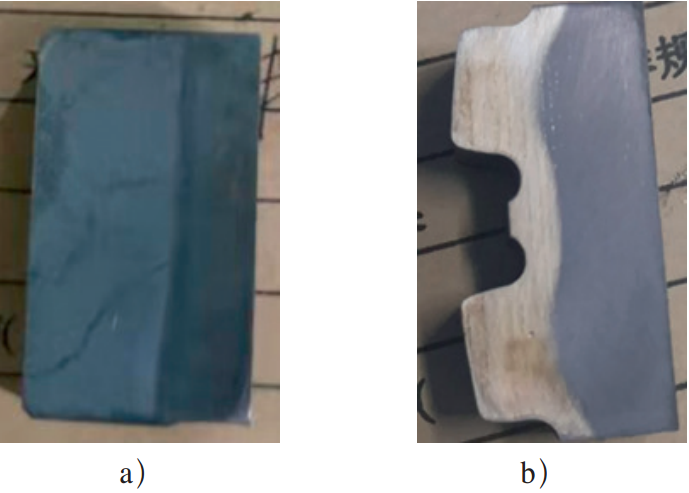
Improvement methods:
- Select an appropriate frequency and use precision-designed induction coils to ensure proper machine tool accuracy.
- After induction hardening, perform a longitudinal cut on the gear (see Figure 19a) to inspect the shape of the hardened layer. Adjust the upper and lower positions based on the observed shape. Cut the gear into four sections at 90° intervals in the circumferential direction and inspect the uniformity of the hardened layer (see Figure 19b). Conduct hardness and hardened layer uniformity tests at three positions: the gear’s upper, middle, and lower sections.
- When using high frequencies, focus on strengthening the inspection of the tooth roots. When using low frequencies, prioritize inspecting the tooth tips.
- Perform magnetic particle inspection on all workpieces subjected to induction hardening to prevent cracked components from progressing to the following process.
12. Cracks at Fillet Radii, Aperture Openings, and Bosses
For specific shaft-type components subjected to scan induction hardening, the preliminary design of the induction coil and improper process parameters can result in insufficient hardening or even fractures at certain fillet radius positions. Similarly, for components subjected to overall induction hardening, cracks can occur at aperture openings and bosses due to the sharp corner effect during quenching and sometimes due to delayed cracking caused by inadequate tempering.
Improvement methods:
- Perform a longitudinal cut on shaft-type gears after induction hardening to inspect the shape and uniformity of the hardened layer.
- Perform timely tempering on the workpieces after induction hardening.
- Conduct magnetic particle inspection on all gears.
These improvement methods aim to address the issue of cracks at fillet radii, aperture openings, and bosses. Ensuring proper design and inspection of the hardened layer, as well as timely tempering and quality testing, can minimize the occurrence of cracks.
Thank you for your reading. For further questions, please contact penny@bdgears.com.
Read more articles:
3 Ways To Do Gear Tooth Modification
What are the errors in gear measurement?

